Disclosure: Product received from Wallternatives for review, but all opinions are all my own.
I have been busy at work on several big projects and the one I am going to share with you today I am just SOOO thrilled with how it turned out! I keep going in the room to stare at it cause I just can’t believe I actually did it and that it came out better than I envisioned.

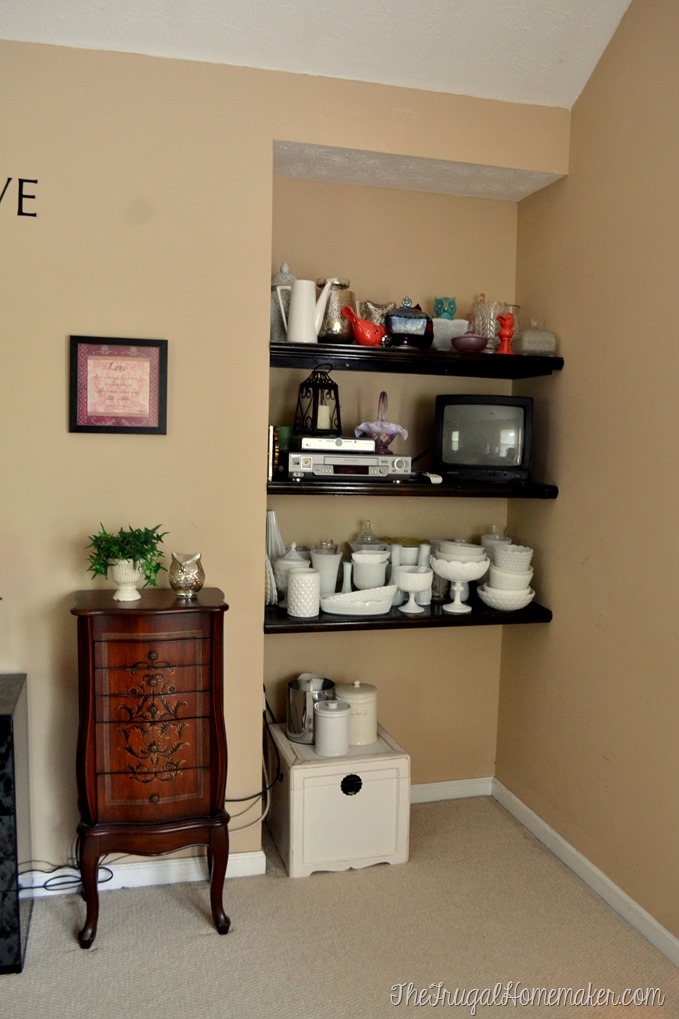
So if you remember from the post I did on our master before I started this makeover, we had this weird little nook in our master bedroom. When we bought the house the black shelves weren’t even there – it was just this weird cut out corner in the room. The guest bathroom is behind this wall plus the staircase to go downstairs so there must have been just empty room in the wall and they made this – not really what I would have chose BUT I pretty happy they did that now ![]()
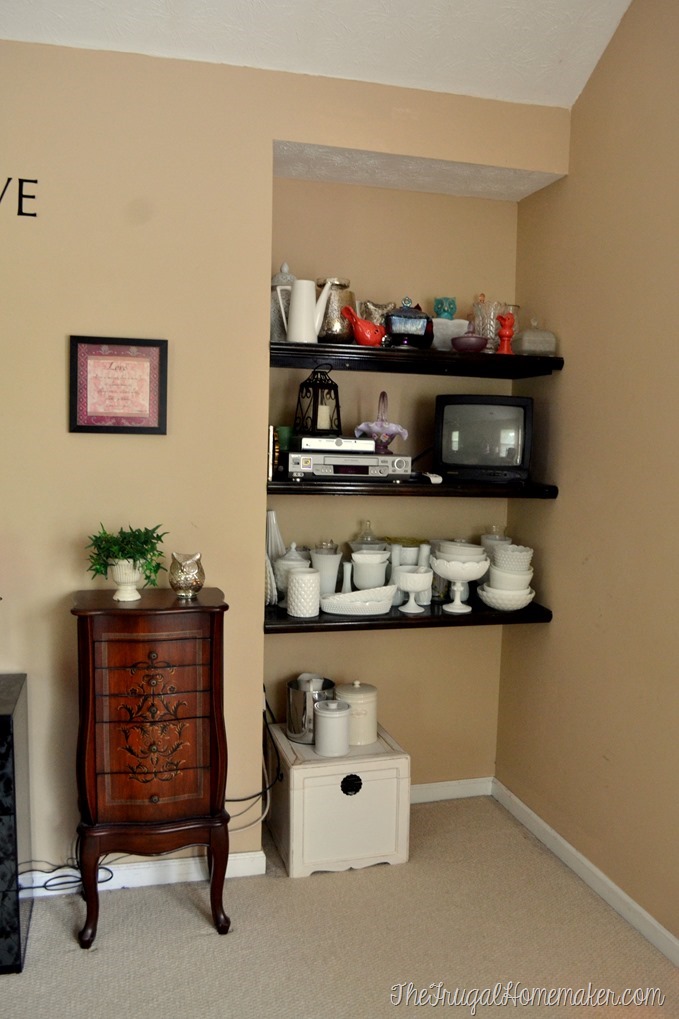
We attempted to put some shelves in there to make use of some of that space – for a while we had a hamper we kept in the larger space at the bottom. But this was before the world of Pinterest, I think before I even had read any kind of DIY blogs or anyone was even writing DIY blogs, and we didn’t exactly know what we were doing. BUT it was done well – those shelves were in studs and we stained them and everything ourselves.
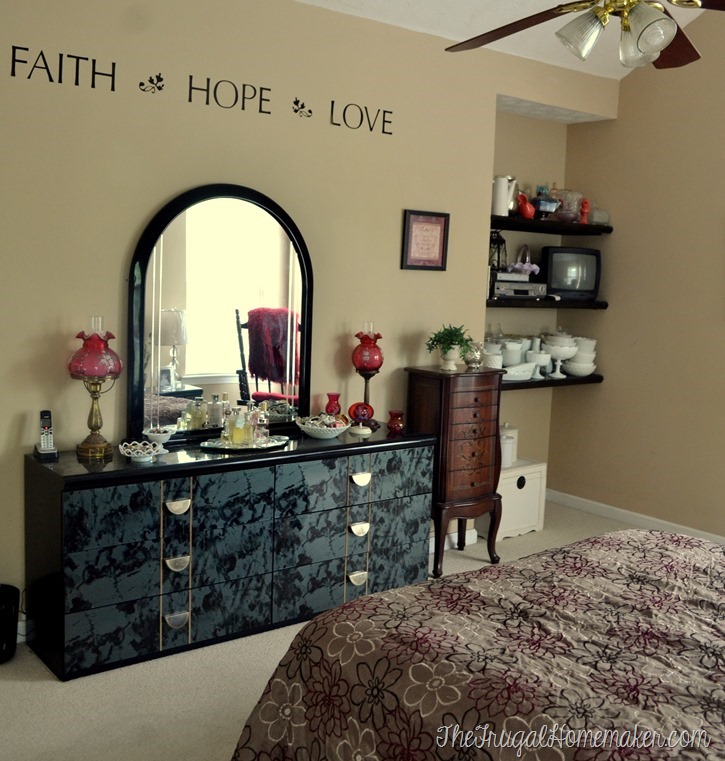
BUT I had a different vision in my head that would make this space not look like a weird nook that someone threw some shelves in and called it done. You can see some of my inspiration pictures in this post or on my master bedroom Pinterest board.
After I repainted our bedroom (Magnet by Behr Marquee), I took down all the shelves and supports and painted out this corner with white paint. I didn’t add boards or anything on the sides – just painted the walls white.

We reused all the boards and supports we had originally used. So I just painted the support boards (the back support boards are 2×2’s and the side supports are 1×2’s) and the shelves with 2-3 coats of white paint (just off the shelf semi-gloss white Behr paint). I added 2 more shelves than we had before so I had to cut 6 more supports and 2 more shelves – I just used some MDF we had in the garage for the other 2 shelves and an extra piece of 1×2 and 2×2.
We had made them be “floating shelves” before by screwing a support board into studs in the back and side support boards into studs on the sides. Then the shelves just rest on top of those boards. In the left corner I notched out a corner of all the shelves except the top and bottom shelves and made the back support 2 inches short to give me a space to run cords for the TV and components down to the bottom.

Since we already had the studs marked, reinstalling the shelves and supports went very fast. I kept the second shelf at the same height as before and just added a top shelf, and then made 3 total shelves about 15 inches apart below the larger TV opening. It is already looking better!

But I had some more things planned that were going to take it from looking nice to looking AMAZING!
I knew that this shelf was going to be very white, making anything I wanted to display on there that was white get completely lost. So I wanted to add some interest to the back. Many people are going with painted backs in their bookshelves or some kind of design. I had seen a product called Wallternatives made by Royal Designs at Haven Conference and just loved it! And I realized this was the perfect place to use it.
Wallternatives is a peel and stick removable type of wallpaper. No paste or water – you just cut and stick to your desired location. It can be removed very easily and reused as well. It is made of a polyester fabric type material so it is very durable and the “sticky” part of it is extremely easy to work with and not “tacky” at all. Sort of like contact paper, but thicker, much more easy to work with and reapply/reuse, and comes in TONS of patterns. I had one piece completely tangled up and it came part very easily, with no creases, no damage, no air bubbles or bumps. Wallternatives has TONS of different designs from wording you can put on walls, to wallpaper type designs, to fun single decals too.

The pattern I chose was Persian Garden Damask in Cream on Gray.
I had already installed the support boards but left out the shelves while I installed the Wallternatives product – just like if you were backing a bookshelf. I probably had all of it applied in less than an hour – it was simple and easy! I just used a straight razor blade to cut it. Matching it up (I had to use more than 1 piece across for each shelf) was not hard at all either.
Already looking more amazing, but I still wasn’t done yet. ![]()
Trim is like adding jewelry or accessories to an outfit… And this outfit needed some accessorizing! ![]()
I picked up several lengths of primed lattice board from the trim section at Home Depot, a piece of crown molding for the top, and a 1×4 primed MDF board for the bottom to close that gap between the bottom shelf and the floor. I spent about $25 on the trim wood which was my only cost for this project since I already had the paint, most of the shelves, and had some spare wood in the garage for the additional shelves.
And that $25 made a HUGE difference!
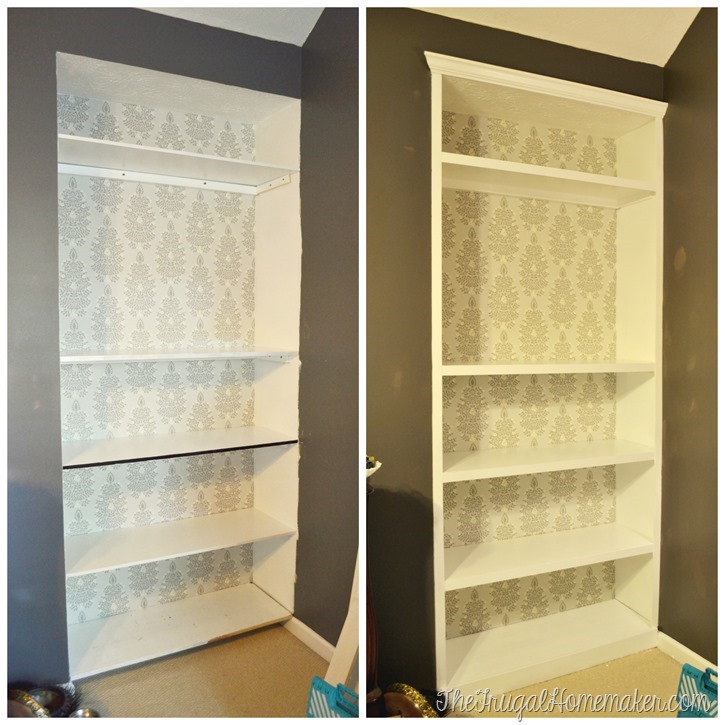
I trimmed out the front of each shelf with a lattice strip using a nail gun to secure it with small finishing nails. I also ran a lattice piece along both sides which really helped to make that awkwardness of how it met the wall on the right completely disappear. Now it looks like a meant to be built in shelf instead of a weird nook in the corner.
I cut the 1×4 to fit in between both baseboards and it completely closed that gap – hiding that carpet made a huge difference too. And added a piece of crown molding at the top.
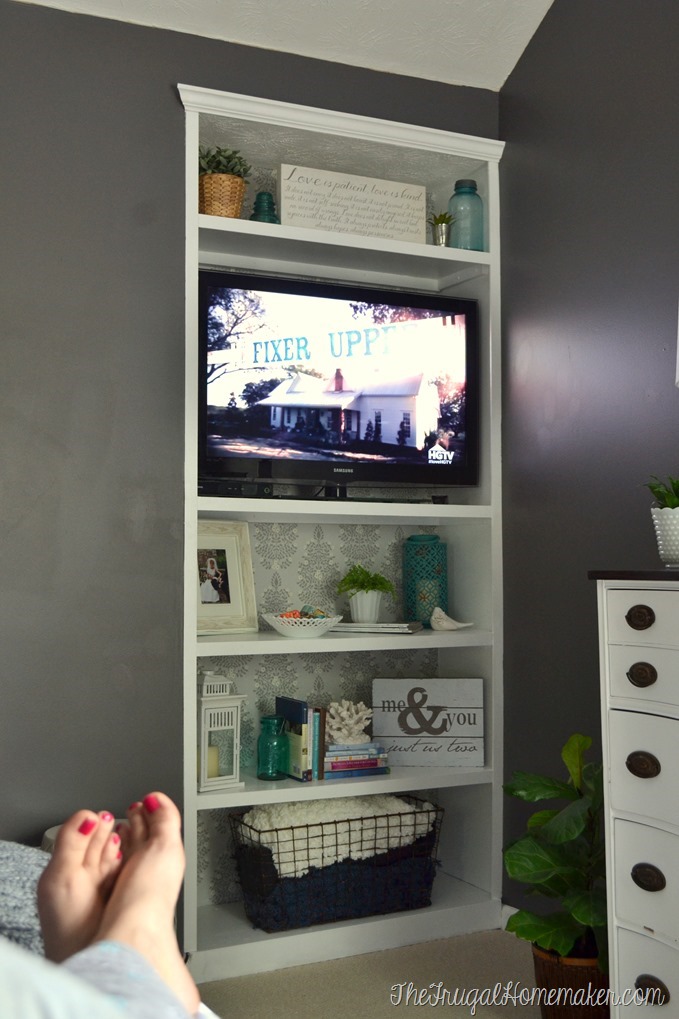
And here is the after! I seriously could not be more in love with how it turned out. Adding more shelves and trimming it all out made a huge difference, but that pattern in the back is like the icing on the cake.

I have never accessorized a bookshelf before so I am definitely still learning and playing around with things. I won’t really keep a lot of books up here – just maybe a few devotionals or inspirational type books I am reading or want to read. I am sure as I finish the room and move more things around that some things will change on these shelves.

I love the extra room to store jewelry, but once I have the other dresser in here I may have enough room on there. I also can see storing scarfs in a basket here during the winter. I am debating about making one of these shelves sort of a memorabilia type shelf for our time together as a couple – a pretty container to store postcards or ticket stubs of places we have visited on vacation, something from our honeymoon or wedding, maybe a picture from our dating years, more wedding pictures – I just have all those kind of things packed up right now so once I find them would love to have some of them out in our room.

I don’t have many “display spaces” in our house – just my mantel, the dresser in the entryway, our coffee table, and the new shelves in the bathroom are pretty much it. So having another space where I can store some of my favorite yard sale/thrift store pretty things just makes me so happy. All the milk glass pieces are yard sale finds, the big metal basket on the bottom shelf and the throws in it are all yard sale finds, and everything else is things I already had from various places and just pulled together.

Here is another shot…
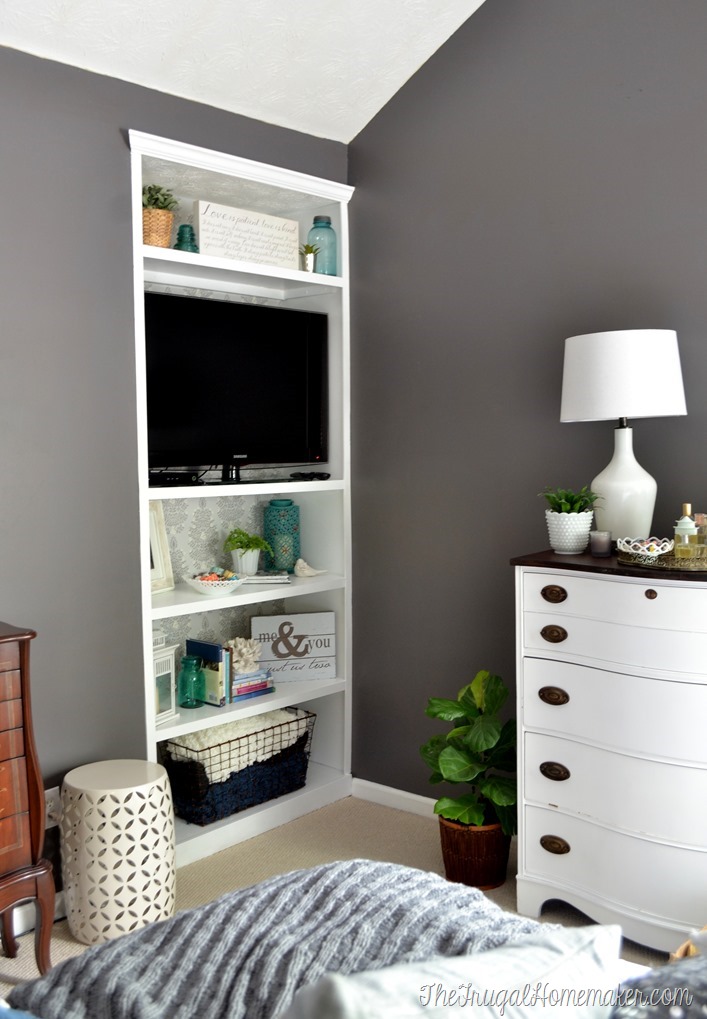
And just for comparison let’s look at the before once more… HUGE difference!
This side of the room is definitely getting there with my stenciled painted curtains, and my refinished chest of drawers. I may actually move this chest to the other side of the room once I get the larger dresser in here – I would LOVE to make this area a sitting area, but I will have to see how it all works in the space.

I know some people are anti-TV in the bedroom people and I understand. We honestly aren’t big watch TV in bed people. BUT the laundry room is right outside our bedroom door so I find myself folding laundry quite frequently on the bed which is a great time for me to watch TV. And once I have the upholstered headboard built for our bed, I can see us heading up to bed to finish a movie or show instead of falling asleep on the couch… ![]()
Now if you’ll excuse me I have a massive pile of laundry calling my name and a Fixer Upper episode to watch! ![]()


LOVE it!
We had a similar odd shaped nook, though much bigger, in the living room of our last house. We built in shelves as well. I loved it for books, toys, DVDs, etc.
Hey Christina,
All I can say is WOW!! What a transformation and so beautiful!! I like the wallpaper backing and what that added, but I think my favorite is the the trim and the crown moulding that give it the “finished look”. You did a great job! I also love your “styling” of the shelves – it’s always fun to see how you incorporate your frugal finds into your home. I, too, am a collector of milk glass and noted your good ideas for display!
Thanks for sharing – Have a great weekend!
Lanita
Great job, Christina! Looks fantastic!
Outstanding job! i love it! Now it looks like it was a “planned” part of the room design. I can see why you want to fold laundry there now!
That looks amazing! Now the niche looks permanent and like it was meant to be there. You did a great job on the built ins and the styling.
WOW!!!!! Huge difference. You are talented indeed 🙂 I sent you an email a few days ago…hope you have received it.
Have a great Friday…
Sherri
What a difference the built in made in your nook! It looks great.
Great job Christina. I love this.
I will share this post with The BookCase Project.
Great piece! Newbie question here, but how did you get the finished look on the crown molding edges? Did you have to cut the corners yourself? trying to do something similar for a space I’m filling