
So remember that little weekend getaway that my husband I took a couple weeks ago? Not only did my friend and I hit up some antique and thrift stores, we also brought along some craft supplies so we could craft one night! ![]()
So one evening after a fun day of thrifting, a round of mini-golf, and the BIGGEST, best pizza we ever ate for dinner, we sat around the kitchen table and broke out the glue guns. (The guys were busy watching a car movie and playing with my husband’s remote control helicopter, so they weren’t bored either ![]() )
)

Here’s our supplies:
- glue gun and lots of glue sticks
- a pack coffee filters (100-150 depending on the size of your wreath and how tight you pack the filters together) – $1.00-1.50
- a cheap wreath form ( I used to use the $1 green hard styrofoam wreath forms from Dollar Tree but they don’t carry them anymore)
Frugal decorating tip
How to make a super cheap wreath form:
You can make your own wreath from from pipe insulation found in the plumbing department at your local Home Depot or Lowe’s.
Edited to add: Here’s the picture right off Home Depot’s site – this is the cheapest version that costs $0.97.
I bought the thicker version that was $1.18.
Then, I cut that the pipe into half (36 inch pieces) so our wreaths were 36 inch wreath forms. So for $0.97-1.18, you get at least two wreath forms!
Tape the ends together with tape and voila, there is your foam wreath form for about 48¢ – I think my yard sale budget can handle that!


There is really no specific way to crinkle or glue the coffee filters onto your wreath. I have seen some people fold the bottoms of each one and pin to the wreath, I go the easy and cheap way – scrunch, glue, hold for a second, DONE!

And you just keep crinkling the filters and gluing them all the way around the wreath. Keep checking to make sure that you are filling in all the holes and that the glue is staying stuck to the wreath. (I think my glue gun is a HOT temperature glue gun so I had to be careful cause the glue would start to melt the wreath form.)

Snack on some yummy cake bars my friend made, keep talking and laughing, and gluing. We had so much fun! And it really didn’t take that long. I would say we were done in under an hour and that was talking, snacking, and taking pictures too.

My friend went home and promptly put her wreath on her Valentine mantel ![]()
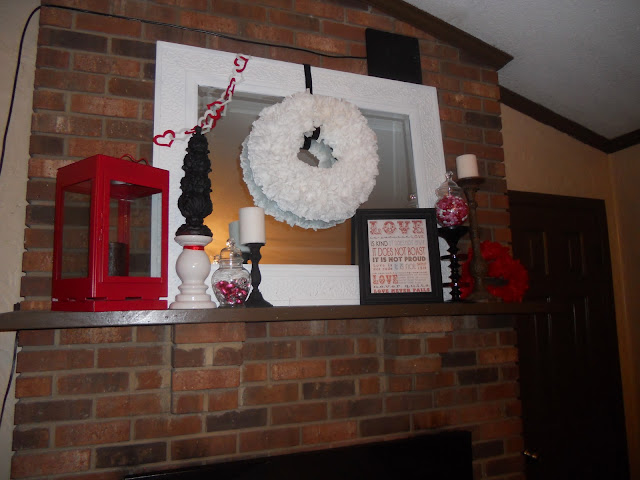
I picked up some gray ribbon at Michael’s last week and hung my wreath over the mirror in my dining room. When you walk in our front door and look to the right – this is what you see ![]()

So fun! and so pretty!

I thought about adding some flowers or something to it, but I actually love the simplicity of just ribbon and a bow.

Perfect for any and every season. And for less than $2.00 – absolutely beautiful!
Oh, and I realized I never have done the BIG reveal of my dining room makeover! I completed it literally as I was putting the turkey in the oven for Thanksgiving and then it was crazy holiday season. So look for the big reveal and before and after pictures sometime in the next 2 weeks ![]() (Update: You can find my dining room before/after post here.)
(Update: You can find my dining room before/after post here.)

You know I love my wreaths! Outside on the front door, inside on the back of doors, on stands, over mirrors – I posted lots of ideas here. And you can see every wreath I have shared so far here.
Oh and this little guy’s brother is hanging in my kitchen – made out of brown coffee filters. I love them both! ![]()

So pick up some coffee filters and some foam pipe, grab a glue gun, invite a friend over and have a fun crafting night! ![]() The thing I love most about this wreath is every time I see it I will remember the fun weekend we had with friends in the mountains. Yay, for pretty memories!
The thing I love most about this wreath is every time I see it I will remember the fun weekend we had with friends in the mountains. Yay, for pretty memories! ![]()
Have you made any wreaths recently?
Enjoyed this post? I have plenty of other frugal DIY and craft ideas to share. Follow me on facebook, subscribe by email, or add my blog to your reader so you won’t miss a thing! 🙂
Love both of the wreaths. What a totally different mood the brown filters give. I could totally make one for each season. Thanks for sharing.
yes, the brown filters make it look TOTALLY different. I love both of them 🙂
can anyone tell me where to get the brown filters – I only find them in the “cone” shape?
Thanks!
Did you know you can dye the coffee filters with food coloring or put food coloring in a spry bottle spay the coffee filters come up with different colors. A teacher did that for her kiddergarden class. She mad automn leaves using the food color.. I think I will try this also. Thanks for a great idea
Yep, I even spray painted them – https://thefrugalhomemaker.com/2012/05/21/coffee-filter-poofs-spray-painted-in-any-color/ Think that was a little easier than dying them and then letting them all dry.
I have gotten mine at Publix and Kroger.
Walmart
I love it !!!
amazing and congratulations for a creative idea !!! God bless you
LOVE this idea! I’ve been wanting to make a wreath to put on my kitchen pantry door, and this is perfect! Thanks for sharing!
you are welcome! It really is a lot of fun, so pretty, and VERY cheap 🙂
Love this! Still need to make one too!
yes, you do! do it as a Ladies craft night at church. or with Amy 🙂
I recently finished a ribbon wreath but love, love love the look of your coffee filter wreaths! I think I’ll try one very soon!
Many Blessings,
Melissa
went over and found your ribbon wreath! I love yours – pinning it for future inspiration 😉
Stopping by from SITS- I am sooo doing this for my (almost) 5-year old’s tea party badthriy party! I can see it now… photos and paper-pieced tea cups dangling…
sounds pretty!
I love that gray ribbon! And this is really random, but your curtains are beautiful too! 🙂
thanks! I love the curtains too – they were one of those really fun, spontaneous things. I made them recently 🙂 will share details in my reveal post 🙂
so cute! I haven’t made anything lately will have to link up next time you do it..I’m teaching a RS class on cute gift ideas and EVERYTHING I’m making is coming from pinterest!
that sounds great! would love to see some of your gift ideas.
What a fun project to do with a friend! I’m sure you guys had a blast!
It looks great in your dining room… can’t wait to see your full reveal!
it was fun! 🙂 Lots of mindless crinkling and gluing 🙂
I am excited to share the reveal too! worked a little on a spring table today 😉
Love this project because it is fairly cheap and you could use a wreath like that for many different times throughout the year:) Thanks for sharing!
Yes, it is very cheap and very versatile! I leave my brown one in the kitchen year round. and the white one – I could easily add a red ribbon for V-day, yellow/pink for Easter, red/white/blue for summer, etc. 🙂
Love the brown wreath! Can you tell me the 2 colors of paint used in the kitchen? They look like the perfect colors of brown and tan I am looking for. Thanks.
Hi Christina –
I had my husband pick up some pipe insulation. When we cut it to 24″ like you said, it seemed so tiny, and hard to get it to form in a circle. Did you really get 3 wreaths from a six foot piece? I was wondering if they are 24″ in diameter, or 24″ of pipe insulation formed into a small circle. I also can’t envision fitting 150 coffee filters on this tiny wreath form. Thanks for your help – it is a brilliant, frugal way to make a wreath!
Andrea,
here is where I got the idea – http://www.thepennyparlor.com/2010/09/coffee-filter-wreath.html
I don’t have my uncut piece anymore but as far as I remember it was 6 foot.
I just went and measured a piece I still have and it is 36 inches!! so, sorry! I don’t know how that works though, cause I remember that I cut my pipe into 3 pieces not just in half?? maybe my piece was longer – 9 foot instead?
I will say the brown coffee filter wreath was done on a little smaller wreath form (it was one I got at the Dollar Tree when they were still carrying them) and my white one is a little bigger. so it doesn’t have to be exactly 36 inches.
Sorry, Andrea! Will adjust the inches in my post and have to try to remember to check Home Depot to see if they come in different lengths?
Thanks for the tutorial Christina! I’m a little late to this craft but plan to make a white wreath using pipe foam to use this winter
Lots of folks seem to have had trouble with pipe foam though. There are some tricks I won’t repeat here but Google “coffee filter wreath pipe foam” to find solutions such as stuffing the inside of the foam with materials like newspaper or plastic grocery bags to help prevent sagging. (Foam comes slit because it is made to wrap around pipes.)
So far as the size goes, I did remember some high school math that is way too late to help Andrea but may help later readers on this site. Circumference is equal to Pi (3.14) x Diameter. So for a 12 inch diameter form(measured straight across), you need a length of pipe foam (the circumference) that is about 38 inches long not taking into account the thickness of the foam itself. (12 x 3.14 = 37.68) So it is possible to get two wreath forms that are ALMOST 12 inches in diameter from one 6 ft tube. (Of course the wreath itself will grow a few inches wider when filters are glued on the outer edge) For a 36 inch diameter form, you would need a length of foam that measures 113 inches or almost 9 1/2 ft so you would need to use more than one 6ft piece of foam for a form that large. The largest form you can get from 6 ft (72 inches) is a little over 22 inches in diameter(72 divided by Pi) I’m also not sure that a pipe foam form that large wouldn’t sag even with stuffing. Pool noodles might be better for those larger wreaths. (but may be too “thick” for smaller wreaths like what Christina has generously showed us how to do)
Do you find problems w/ the hot glue sticking poorly to the tube??
it did a couple times. actually it started to melt it a little in some places (but I think I have a hot temperature glue gun, you can buy a cool temperature one too.) But I found that adding a little more glue and holding it in place worked fine! In some places, if I thought it needed it, I would even glue the sides of the filter to the filter next to it.
are you making one? would love to see it!
If I make one I will show it to you. I love yours on the mirror.
yay! I would love to see it!
and I do like mine on the mirror too – although you can put it anywhere!
Pipe insulation??? I was starting to think that wreath forms were a little pricey. I made my first wreath recently. A paper drink umbrella wreath! Turned out awesome. I found the picture on Pinterest but sadly it didn’t link to a blog, so I have no clue who to thank for sharing… My kitchen needs one of these thank you for sharing. 😀
Donna, I updated the post with a picture and link of the exact thing I bought at Home Depot. Hope that helps! 🙂 It really is simple and easy and CHEAP to make your own wreath form. Now these wreath forms are very light so they can’t be used for heavy things but perfect for coffee filters, maybe even yarn, and would have probably worked for your wreath too. Would love to see a picture of your wreath! Post it on my facebook wall! 🙂 https://www.facebook.com/TheFrugalHomemaker
Do you have a picture with the paper drink umbrella’s? I would love to see it.
Christina,
Would you think this would be a difficult for 6, 7,8 year olds to make for their mom’s for mother’s day? I know i would need to help them with the hot glue gun. 🙂 Thanks,
no, I think they could do it! maybe a smaller version (you could cut the pipe smaller for a smaller wreath) It would be time consuming though. Are you a teacher? Maybe spread it out over a day or two.
try a cool or low temperature glue gun too that might help and be prepared with plenty of glue sticks. I would say I used 5-6 on one wreath. I use a mini glue gun, by the way.
Years ago I made a wreath similar to this with gold metallic paper for my in-laws 50th wedding anniversary. I inserted 50 – $1 bills into the wreath with a “u” pin. They were able to remove the money and had a nice wreath to enjoy. I thought of that when I saw this. Also, could do that as a group going together to give a “money” gift.
that is a great idea in place of a money tree type thing! thanks so much for sharing that! will keep that in mind 🙂
How did you hang the wreath from your mirror. I am definetly going to make this!!
Since I hang wreaths often from this mirror, I nailed a small nail in the back on the top frame. (Does that make sense?) So I made a loop in the ribbon that hangs on that nail and then tied a box that lands at the top of the mirror frame.
You can use large suction cups, a command hook on the wall right above the mirror/frame, and I am sure other ways!
Hope that helps!
I LOVE this idea! I am wondering though, how did you attach the ribbon? I love the fact that it’s in a bow too. I can’t wait to make one and since they are so cheap and easy I may make a couple for gifts! I always seem to struggle with getting the right ribbon and attaching it in a way that doesn’t look bad. I would love to know how you did yours, it is SO beautiful!!
I can’t remember – let me go check (I usually hot glue them)
Ok, I actually took a couple pictures on my phone and uploaded them to facebook – https://www.facebook.com/photo.php?fbid=398194873527286&set=a.305028786177229.96107.226133907400051&type=1 – check this picture out and then there is another one too of how I did attached the wreath to the mirror https://www.facebook.com/photo.php?fbid=398197300193710&set=a.305028786177229.96107.226133907400051&type=1 and how I hot glued the ribbon of the brown one right to the door 🙂 https://www.facebook.com/photo.php?fbid=398195140193926&set=a.305028786177229.96107.226133907400051&type=1
I really love the coffee filter wreath. It made me wonder if you could do it on a smaller scale, say for easter garland or a girls birthday decoration with cupcake liners. What do you think? Maybe I will try it (along with the coffee filter wreath of course)! Thanks for the great ideas.
you absolutely can do many other things with coffee filters! or cupcake papers – here is a search on Pinterest for just the words coffee filters and you can see what comes up. 🙂 http://pinterest.com/search/?q=coffee+filter
also try searching on their cupcake papers – http://pinterest.com/search/?q=cupcake+papers
Lots of ideas and so little time is what I always say 🙂
Oh..love the white and the brown!! how resourceful to use the tubing!! They both look incredible ! Thank you for sharing at Uncommon! Bonnie 😉
ps..just saw that you are going to Haven! We are too! Hope to meet you there!! Love your style!
Made this with my daughter. So pretty and we had a good time. AND it’s soooooo cheap.
Yay, so glad you made it, Vienna! It really is a fun craft to do with others 🙂
Love this in both white and brown filters. I know my friend Carol could make it.
I love both of them too!
I wanted to make a wreath and I followed your tutorial and made one with the brown coffee filters. Yours is way more beautiful than mine, but I plan to make more so hopefully they will get better. 🙂
Jess @ The Delightful Crafter
maybe just add some more coffee filters? you have to really stuff them in there so it doesn’t looks sparse. don’t be afraid to add more 😉
So simple yet so pretty! I love it over the mirror in the dining room.
Thanks, Jae – I do too!
I absolutely love this!! I’m going to attemp this tomorrow!! Thanks for sharing 😉
-Fotini { http://glamorousbride.blogspot.com }
How did you attach the bow to te wreath for hanging?
I just hot glued it to the back of the wreath on the pipe insulation part.
LOVE your wreath!
thanks!
I love your paint colors on the wall in the last picture of the brown wreath on a door next to a kitchen. Could you tell me the paint and colors they are.
this is awesome…LOVE the wreaths!
thanks, Amy! My coffee filter wreath is my most loved wreath of all time 🙂
I tried this tonight and took my supplies to my girlfriends to work on…I was so bummed that the pipe insulation would not work for me to make a wreath, it seemed no matter what I did, it would not form a circle. It kept bending and kinking, I don’t know what I can do with that stuff now, it appears to be the same thickness as the one you used, sigh, what did I do wrong?
hmmm… not sure why it didn’t work? I will say, because of the nature of the wreath – crinkled filters, etc. It won’t have to be ‘COMPLETELY round”. Although mine is pretty much round. How long did you cut your piece of pipe insulation? maybe it wasn’t long enough?
The tube isalation, you could probably use a swim noodle!
yes, you could. I just didn’t read about that until after I tried the pipe insulation.
If you use the foam pipe, does it “pull” the wreath down making it appear more oval than round when it’s hung??
I’m making one of these for my father in laws door who is in a nursing home, but I bought a regular wreath form (but they are pretty costly, so would rather use the foam if it holds it’s shape.
Thanks and thanks for the great idea!!!!
Hey Susan, I have found with the coffee filter wreaths it doesn’t “pull” the wreath down at all. Because the coffee filters are so light they don’t weigh hardly anything. Mine is a perfectly found shape. Now for anything else I am not sure. I was afraid to do my yarn wreath on that kind of wreath form because I knew I wanted to add flowers and they would have weighted it down.
I am making one of these wreaths for my FIL who is in a nursing home. I bought a regular styrofoam wreath to use because I was afraid the foam form would sag and look more oval than round. Does the foam hold the round shape??? If so, I’ll be buying that for my next one.
Thanks!
hey, answered you in your first comment. Hope you get it. 🙂
I did Christina, TY!!!!!!
OK, thank you for the response, just one more question. I’m almost finished with my first coffee filter wreath and it looks FANTASTIC!!! I want to add a red felt bow just to add some color to it, but the wreath is so thick, I don’t know how I will get the bow to stay. I can’t tie it because again, wreath is too thick so any ideas on how to add a red bow would be greatly appreciated!!
Thanks!
Do you cover the whole tubing–front and back? OR just the front? Thanks, Ruth
This is lovely. I love the wreath but I also love your curtains and the wall color in your dining room. Can you tell me the paint color and where you bought the fabric ad the name of the fabric? Thank you so much!
I made these and dyed the coffee filters with fabric dye for a nice vibrant color!
I’m having trouble with my foam wreath form staying circular 🙁 any suggestions?
hmmm… it probably has to do more with how it is hung. If there is weight being pulled on it from how it is being hung it will not hold it’s shape. My wreath is pretty much weightless. Did you do a coffee filter wreath or something else?
maybe try reinforcing/straightening it out in the bent parts with packing tape?
Hi . . . I clicked on to your site in hopes of finding the tutorial for your coffee filter wreath but the only thing that was on the page was the title, your advertisers and the 90 comments about the wreath. Where would I find it? I click around to your projects and still couldnt find it. This is a first for me . . . . thanks!
Count me in for starting on this wreath this weekend!
I already have all the supplies. Great idea!
I know this will sound stupid. but when you say you “scrunch and glue”.. you are scrunching the coffee filter kind of together.. making the very middle of the filter like a point (if you will) and the rest poofed up– to kind of look like a flower? and then gluing that middle “point” to the foam? Or does that make each poof too tall? How weird for me to be confused on scrunching.. would appreciate the feedback.
This is ingenious! What a clever project! Love, love, love!
How did you attach the ribbon to hang it?
My girls and I had black Friday craft day and I made the white coffee filter wreath, scrunching 200 of them!! My wreath is gorgeous! Thanks so much!
you are welcome! And yes, I love them! I think they are really pretty!
I’m making a coffee filter now. : ) Thanks for the projects, I love them & all your tips.