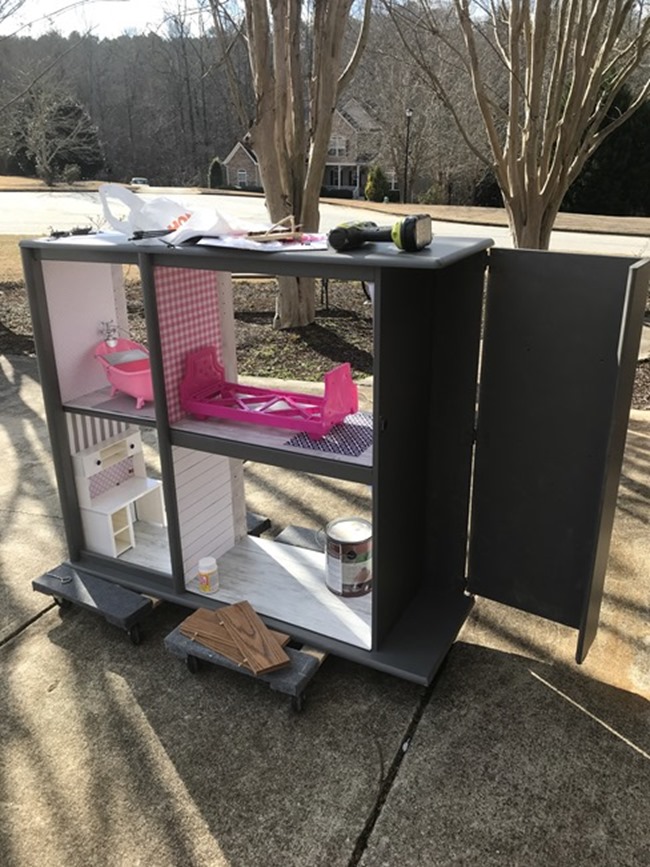
So if you’ve been following along my $100 room challenge this month you know that I needed to build a dollhouse to fit 18 inch American Girl style dolls. I considered several options and when I added up the cost of lumber to build one from scratch it was going to be well over $80 just for the 2 –3 sheets of plywood. So I decided if I could find something ready-made that I could just adapt it would a much better option. I walked in our local Habitat for Humanity store and checked out several entertainment centers. They had several but I decided on this one because of the DVD cabinet on the side that I knew would make a perfect CLOSET! ![]() It was $25 but 20% off so only $20 – so much better than $80 for lumber.
It was $25 but 20% off so only $20 – so much better than $80 for lumber.

Here it is at home and you can see what it looks like with the DVD cabinet shut.

The first thing I did was remove anything I didn’t want such as the glass doors, the doors on the bottom and some trim pieces. Then I moved the shelves around to fit the dolls. Since the dolls are 18 inches tall you need at least a 20-24 inch space for most of their scale furniture and for them to fit. I ended up creating four 22 inch sections. I also moved the shelves in the DVD cabinet to be above the metal racks instead of below (not pictured yet since I still needed to paint)

Next I primed it with some primer I had left from painting our kitchen cabinets. It was that smooth laminate material and I figured a coat of primer and paint with primer couldn’t hurt to help the paint stick. I gave the whole outside 2 coats of dark gray paint. I was just going to do a “faux wallpaper” on the back of each section but the insides had lots of holes from the adjustable shelves so doing wallpaper on all 3 walls made for less painting and also covered all the holes. Here it is in mid-process of working on the wallpaper and before I put the back on. The wallpaper is all just 12×12 scrapbook paper that I applied with mod podge. The only lumber I had to buy was a thin sheet of 1/4 inch plywood and I used half the sheet to go on the back. Then I could continue the wallpaper onto the back as well. Oh and the floors are some scrap pieces of click together vinyl plank flooring we had in the garage… so it even has plank wood floors :). Will help with paint not getting scratched all up with lots of playing as well as look cute! Y ou can buy vinyl tiles or planks by the piece at Home Depot and this only took I think 6 long pieces so definitely worth it if you are attempting this project!

And here it is all finished!! What a transformation! Even I was quite a bit surprised and had so much fun at the end doing all the decorating and accessorizing! I had all the furniture and accessories – the kids had already had and been playing with everything except the kitchen which I had stored away as a surprise. All of the furniture came from yard sales or Facebook marketplace – I think I paid $10 for the desk set, $10 for the beds and $5 for the tub set and the kitchen set was passed down from a friend. Most of it is the Our Generation line from Target and the desk is the My Life brand from Walmart.

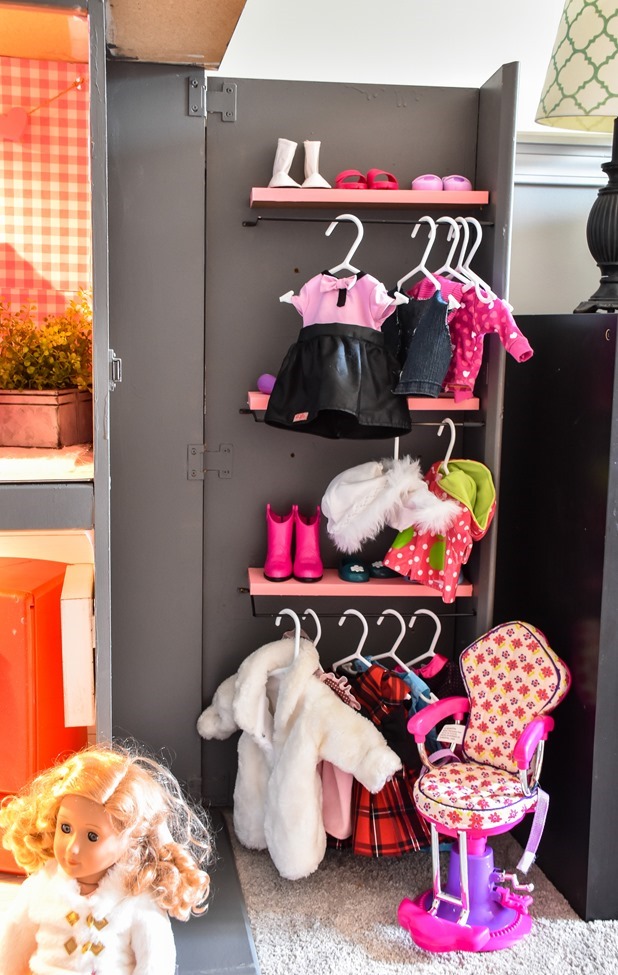
That end DVD cabinet is so perfect for a closet and can be closed when not in use. I even made some DIY hangers using kids hangers from this tutorial.

Let’s take a tour of each room and I can explain what I did to accessorize and decorate… 🙂 The bathroom was probably the most challenging as I couldn’t really find or didn’t have anything super cute for the wall. I may be on the lookout for a cute bathroom sign or something or maybe a mirror? But for now I hung the towel/robe on the wall on a command hook. And grabbed a wood heart (originally from Target dollar spot) fromy Valentine decor bin to hang on the wall. The scrapbook paper/wallpaper is just simple polka dots in here. The rugs are all made out of sheets of felt that I embellished with pom-pom trim. So cute for so cheap – 77 cent felt and $1.00 worth of pom-pom trim.

IThe bedroom has pink check wallpaper and another piece of fur felt for a rug. I grabed a pink wood heart banner from my Valentine bin (again originally from the Target dollar spot) and cut in half to hang on the wall. I had the little metal frame in my stash and thought it was cute for the wall and then just grabbed a faux plant from my stash to add to the corner.

The kitchen is my absolute favorite room – it was SO fun to pull together! I used shiplap scrapbook paper for the walls which was so fun! Another sheet of felt and pom-pom trim made an adorable rug!

I had these little chalkboards in my stash and I just wound up some faux greenery garland and made a simple wreath to hang on top… just adorable!!

That Welcome Home sign was from Target dollar spot last spring I think and was perfect for this wall. That doll was my little girls Christmas present this year. 🙂

The office turned out so cute too – gray and white scrapbook wallpaper is in this room with a fun gray rug (felt again) with some rickrack trim. I used the other half of the wood heart banner in here and the little wood home came from the unfinished wood craft section at Hobby Lobby. The chalkboard was made out of a simple white frame and a roll of cork I had in my stash – sometimes it pays to be a craft hoarder 😉 All the other accessories came with the desk set.

I really wanted to add lights and debated several different options. I knew I could get the little push puck lights but I also knew that kids would leave it on and we would go through batteries like crazy. I debated Christmas lights or the little wire fairly lights but wiring all those around the edges was complicated. I had a bag of extra under the cabinet lights (these are similar) that I had used in our last house and happened to have 4 – just enough to do this project! I just screwed the lights to the ceiling and then brought the cord out through the back of the house. They have plugs on the end so I just plugged all of them into an extension cord in the back. I love how much light they give and that we won’t go through tons of batteries! 🙂

The little closet area turned out so cute! I should have tried out some clothes on the hanging racks and I may have adjusted the height/distance between each shelf but this works fine. I painted the little shelves with some pink craft paint from my stash just to add some color and fun in the closet.

My little girl and nieces and nephew LOVED seeing the finished product and have already enjoyed lots of imagining and playtime. Would be so fun to add a small Christmas tree for Christmas and just have fun with it!

Even though this project was frustrating trying to work in freezing temps outside as I painted and installed flooring/adjusted shelves, the decorating and accessorizing part of it was so much fun! When it was all finished I wanted to sit down and play. 🙂

I love that I gave an old unwanted piece of furniture a new life too – no one really wants these old entertainments centers but they make super cute dress up clothes storage, play kitchens and dollhouses! 🙂 I just an identical one this week for free on facebook marketplace and see them all the time for super cheap at thrift stores/Habitat stores/yard sales.

Let me know if you have any other questions about anything else I did!

So here’s what I spent:
- media center – $20.00
- 1/2 sheet of 1/4 plywood -$7.49
- 36 sheets scrapbook paper x $0.25 each – $9.00
- 4 felt sheets x $0.77 each – $3.08
- pom – pom trim for rugs – $2.48
- Home wood sign – $1.49
- paint – already had
- all other accessories – already had
total $43.54
Astonishing!! Amazing!! Beautiful!! WOW!! This is just spectacular!! Great, great job!
Christina, you NEVER cease to amaze me!!! ??
Ok, you just went over the top with this project, it is the cutest thing ever!!! The side cabinet as a closet is genius! I have also seen play kitchens made out of old furniture pieces like this, and I love seeing these things repurposed. Fabulous job! Even more so, your little girl will know that you put so much time and love into making this for her, which makes it even more special?
This is really cute! I know some people who might want to copy this, so I will share it with them. Also…. I’m having a hard time seeing how to pin this? I’m using Chrome on a PC laptop….
How did you get those shelves removed? We have almost that same entertainment center and the spot where the TV would go (and a shelve on the left) and very securely in there. I can’t get them to budge. Did you cut them? I am assuming they are re-enforced because of the weight of TV’s a while back.
Such a cool idea.