I am SOO excited to share the reveal of the master bathroom with you today! Whew.. I was coming down the wire with this one – so many projects! But seeing the after makes it all worth it!
So I did this bathroom makeover as part of the One month, One room, $100 challenge that was originally started by Erin at Lemons, Lavender, Laundry. Basically, we challenge ourselves to give a room in our home a makeover, in one month, on a $100 budget. So not only is the budget tight, the time is too!
We moved into our new-to us home a little over 2 years ago and it was in definite need of some updating! So I have gradually worked on painting, updating, furnishing, and decorating each room and this was the last room that hadn’t gotten a fresh coat of paint yet or really had anything done to it. So it was the perfect candidate for this month’s makeover. Let’s go back and look at what it looked like before…
The room was very white – white tile, white bathtub/shower, white counters, white knobs on the white vanity, and no real character at all. The paint color wasn’t bad but I was ready for a change and ready to add my style to this room.

And here is how this cabinet looks now. ![]()

A fresh coat of light gray paint on the walls was the first step, and then the vanity needed a fresh coat of paint and some new hardware. Then I added a simple wood stained frame around the mirror and made a DIY farmhouse sign for the wall. See a full tutorial on how I create signs like this one here.
I had brought the shower curtain and most of the decor from my master bathroom at our old house and was ready to change some things up here for a new look.
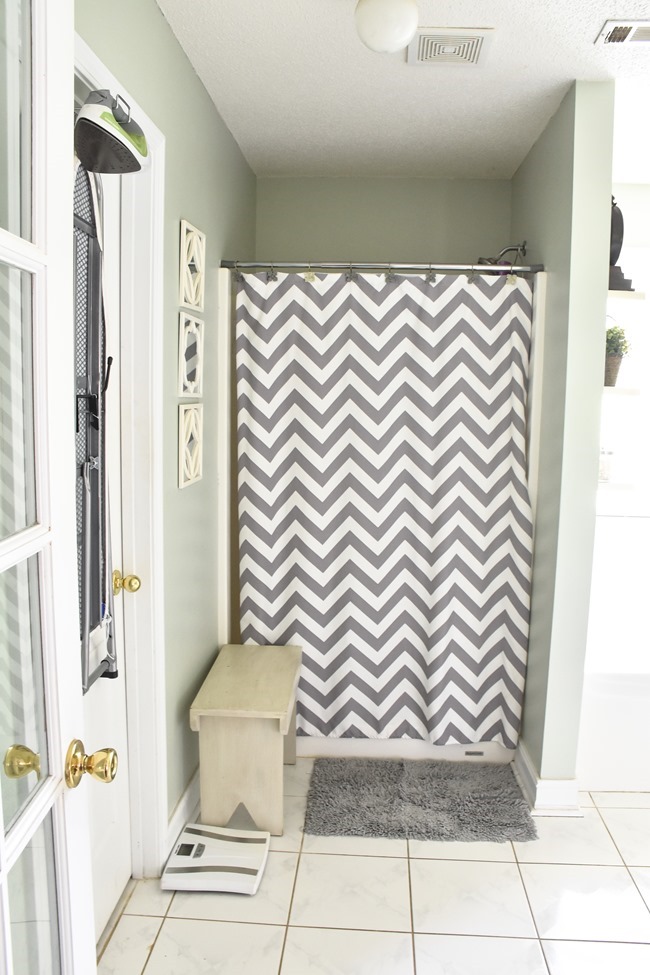
The first thing we needed over here was someplace to hang towels. I grabbed a scrap piece of wood from our pile, stained it, and then installed some simple coat hooks. I also gave the bench a fresh coat of paint with Rustolum Chalked paint in Charcoal. I had found this shower curtain almost a year ago at a yard sale for $1 and was rotating it in and out of the guest bathroom when I needed to wash one – so I stole it for this room now. ![]() I didn’t think all white would work in here before because everything was so white but now with all the updates I love it!
I didn’t think all white would work in here before because everything was so white but now with all the updates I love it!

I sold the white mirrors on the wall for $10 on facebook marketplace and stole that brown clock from the kitchen.

So amazing what a fresh coat of paint on the walls, and some simple updates can make! I took down the light fixture and spray painted the base since budget didn’t allow for me to replace it. Definitely doesn’t look as bad now!

Here’s the tub area and it had some subtle changes as well. I sold that metal piece on facebook marketplace too for $20 so I could add a bit to my budget for some new decor – I’ll break down the budget at the very end of the post.

I had this white wall medallion (found at Kohl’s several years ago but they have a very similar one in stock now) just in my decor stash and really loved it more than the other one. It actually hung over my tub in our last house master bathroom so back in here it came.

I didn’t think I was going to have any budget for curtains but then I remembered that I had a set of curtains I ended up not using in my previous house bathroom that I had kept to see if they would work. You can see more details here but basically, I found one curtain panel at Goodwill years ago – cut in half longwise, then cut a shorter portion off the bottom. I ended up using the shorter portion off the bottom and created a valance for my previous house master bathroom (and it stayed with the house), but these ended up working perfect in here! So glad I saved them!

More views of the curtains and shelves… the shelves came from my old house too and I love the extra storage and space for decor they add.

I rearranged and switched out a few pieces of decor – grabbing some things from around the house and using some of what was on here in another place in the bathroom.
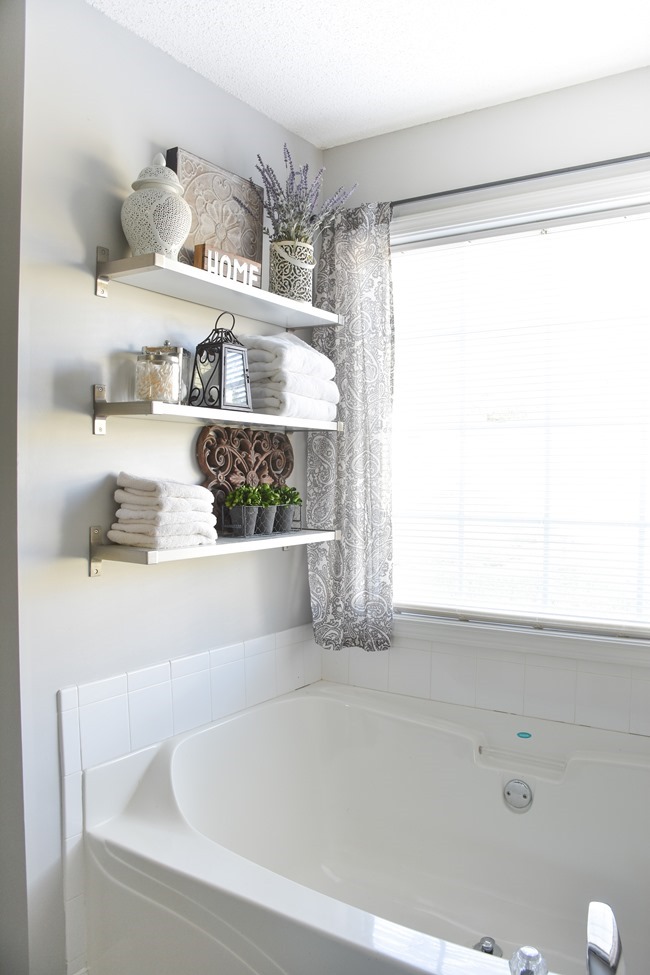
One more view this way…

Hoping I can put the ironing board on the back of that closet door now – cause this view is just too pretty now! ![]()

Here’s another before view of the vanity…

And some after shots! You also can probably tell the tile/grout looks a bit different. I spent several hours one evening with a scrub brush and some simple soap and water scrubbing the grout like crazy to get all the built up junk off. It looks so much better and I hope to apply a sealer to it soon so hopefully, it won’t get bad like that again.

I had a vision in my head of what it would look like with the vanity painted dark gray and a wood frame but seeing it all come together is just amazing!
I knew I wanted to add a sign on this wall but wasn’t sure what to have it say and also budget didn’t allow for any purchase of wood. When I was getting my fall things out of the attic I found this Pumpkins, Apples, Hayride sign I painted a few years back and realized I could paint another sign on the back and add a frame with some wood from our pile. Then I won’t have to store the fall sign in the attic and if I decide to use the fall sign in my fall decor, we’ll just have to not have art on this wall for 2 months ![]() Wasn’t sure what to have it say – didn’t want any kind “rules” like brush, floss or typical bathroom signs. I really wanted something that would greet us in the morning when maybe we wish we weren’t out of bed yet, and inspire us to put a smile on our face and have a good day – so this was perfect! See a full tutorial on how I create signs like this in this post.
Wasn’t sure what to have it say – didn’t want any kind “rules” like brush, floss or typical bathroom signs. I really wanted something that would greet us in the morning when maybe we wish we weren’t out of bed yet, and inspire us to put a smile on our face and have a good day – so this was perfect! See a full tutorial on how I create signs like this in this post.

So I love all of the room that I have showed you so far… but I have saved the best for last because I REALLY love this next part. We had this little room that houses the toilet and contained no character/design/decor whatsoever…
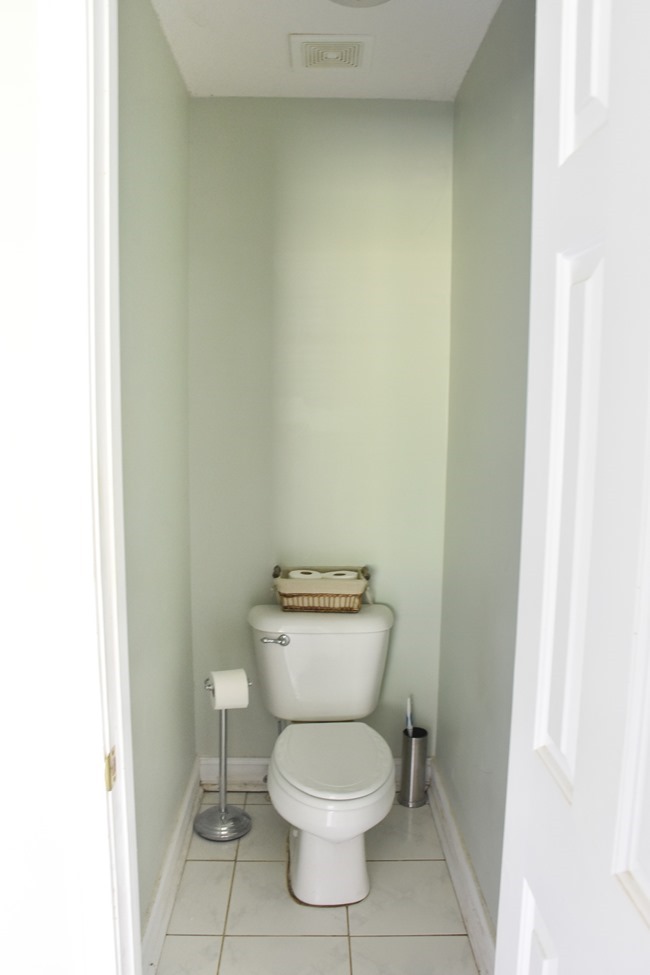
But not anymore!!! Is it crazy that this little tiny room with a toilet is pretty much my favorite room in the house right now?!

So I did an entire post of how I added that faux brick to the wall (it’s actually a wood panel from Home Depot) and then did a faux German Schmear technique on it – you can read the entire tutorial there and watch snippets of video I recorded throughout the whole process saved in my Instagram story highlights. Several people gave ideas for decor above the toilet and honestly, that wall steals the show, so just hanging a simple green wreath on it could have been enough. But I had my heart set on rustic/industrial shelves and I love how it came out.

I was so busy working on the room that I didn’t get to publish a post on the mirror frame, towel rack, the toilet paper holder, or the shelves – but if you want more info I could work on that post for next week. I spray painted the toilet handle, and also took down the light fixture in here (that you can’t see) and spray painted the base oil rubbed bronze. Just simple things that pull a room together and didn’t cost anything because I already had the paint.
I really wanted to get rid of the toilet paper pole in here and found this idea to make a holder out of pipe pieces and a piece of wood.

I would never really call toilet paper cute.. but I might have to call this one just adorable!
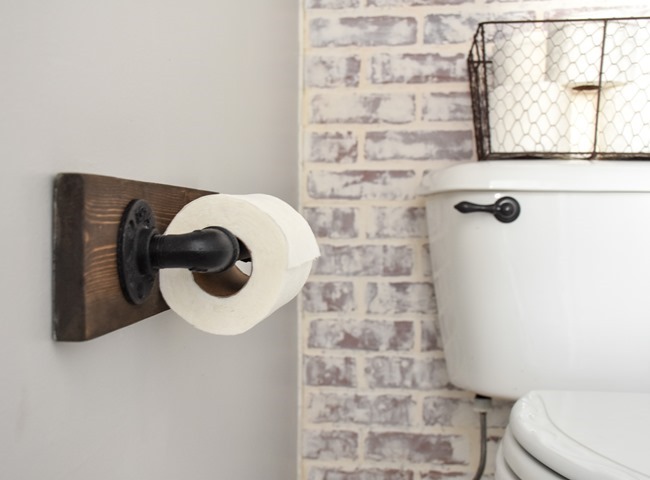
I stole some of my glass jars and the clock from the shelving above the tub and then added some other pieces I found around the house for the shelves in here.

The cute little sign was a $1 yard sale find last month at the most amazing yard sale I have every shopped – see my crazy finds saved in my Instagram stories here. And I love how this sweet little Lavender candle from Antique Candle Works just goes so well with all my decor.
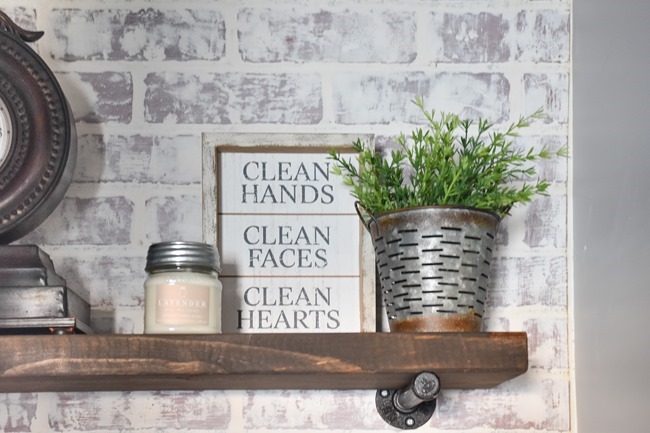
Have you ever been to a cool, local restaurant and go back to the bathroom and it has this amazing rustic/industrial vibe with exposed brick and pipes and bowl sinks? I seriously feel like I just took that bathroom home and I absolutely love it! Seriously looking around at every room in my house trying to figure out if I can add a brick wall in each one! ![]()

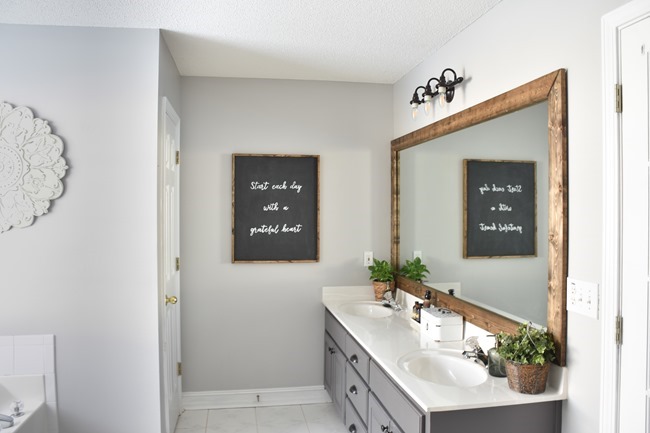
This bathroom has come a long way and I just love it now!

So now for sources and budget.
- Wall paint – (Behr Marquee Chic Gray) bought in January for laundry room makeover but didn’t work in there so I’m calling this free since it was sitting in garage just waiting to be used. – $0
- Vanity paint – I used leftover paint from my master bedroom/bathroom to paint the vanity (Behr Marquee Magnet) and bought the hardware online from D. Lawless Hardware – $10.67 for hardware
- Mirror frame – I used Varathane Classic Stain in Dark Walnut to stain all the wood in this room – I bought 3 1×4 boards = $14.04
- Towel rack – I used a scrap piece of wood from garage, stained in Varathane Classic in Dark Walnut, and added 3 inexpensive hooks from D. Lawless Hardware – $3.00
- Toilet paper holder – used scrap wood left from mirror frame, flange – 1.99 (Hobby Lobby), elbow – $2.52 (Home Depot), 5 inch pipe – $2.32 (Home Depot), cap – $1.49 (Hobby Lobby) – $8.32
- Brick wall – I used about 2/3 of a brick panel from Home Depot – $28.00, and 1/4 of a huge container of joint compound – $7.24 = $35.24
- Wood shelves – I used leftover wood from another shelf I created just recently (show you next week!) so I’m counting 2/3 of the cost of a 8 inch wide board from Home Depot – $5.20. Brackets were created from 4 flanges – $1.98 each (Hobby Lobby), 4 – 8 inch pipes- $3.68 each (Home Depot), and 4 caps – $1.49 each (Hobby Lobby) = total of $33.80
Which brings me to a total of $105.07.
But remember how I said I sold the large metal wall art for $20 and the mirror set for $10 – so that gave me $30 that I could spend on this room if I wanted. It’s technically allowed in the $100 room challenge rules and I think we all sometimes do the same – sell the old dishes, put the money towards new, sell the old coffee table, put the money towards a new one.
I knew I had no budget in my room for decor or really new anything since the wood, shelf brackets, hardware, and brick wall was going to take it all. But I saw someone on Instagram post about these light fixtures that were on sale back on Labor Day at Lowe’s so I went and picked one up for $15 – a steal for a new light fixture!
Here’s a shot of the old one with all the new stuff I had done to the room…

The new one just makes a huge difference! I’d like to find some Edison bulbs to add to it but just haven’t had time to shop around for them.

The other thing I had to buy was a curtain rod and I just picked up a basic one for $9.78 at Walmart. So I still came out with $5+ from selling my old finds and buying some new decor/pretties for the room.
I know that you may not have a can of paint for the walls or leftover paint to paint a vanity or shop yard sales like me and have a stash of decor to pull from – this post and challenge isn’t to necessarily show you how to duplicate exactly what we do for the exact same budget. It is to inspire you and to encourage you that doing a full gut job on a room or spending hundreds of dollars on new whatever isn’t always the only option. Look around and see what you do have to work with – maybe leftover paint from painting your bedroom that you could use to paint a laundry room or bathroom? Or maybe you could buy an oops can of paint or watch sales and pick up a quart of paint for less than $15 to paint a vanity and then just spray paint your current hardware? $100 or even less can go a long way to giving a room a major makeover if you get creative!
Thanks for following along and cheering me on this month – make sure to follow me on Instagram here and check my stories as I am really starting to utilize them to share all the behind the scenes stuff and sneak peeks/in process stuff as I am working on projects.
Over 25 other bloggers did the $100 room challenge along with me this month, so go check out their amazing before/afters too – lots of ideas and inspiration!
Amazing!!! You did a wonderful job with your bathroom! I loved it, and then I came to the toilet room, it is the best transformation in the bathroom. Even though everything looks amazing, that is my favourite!
It’s looks so good!! I love the German Schmear brick wall behind the toilet! It adds so much character to that small space! Great job girl!
Looks great!!! Of course you have done a beautiful job with all your projects. I have a sign hanging in my office, that says ” start each
day with a new attitude and plenty of gratitude! Your sign made me think of this. You are Blessed!
Christina, your bathroom is beautiful! I especially love the industrial shelves and fixtures you made using the stained boards and plumbing pipe. That was definitely a steal of a price for that light fixture and it really does make a big difference. But I think the brick wall steals the show! This challenge reminds me of my favorite old school HGTV show called “Decorating Cents” where they made over a whole room with $500 (usually a larger room like a living room, kitchen or bedroom) and used so many frugal ideas like repurposing items from the home or thrift store/garage sale. I miss that show so much, it was on back in the day when I was a young married mom on a tighter budget with a desire to make my little house cozy and beautiful.
Christina, Your bathroom looks beautiful! The brick wall project is my favorite. It adds so much to the bathroom. You have styled this room so pretty and the curtains look perfect.
Well done! An amazing transformation!
Thanks for sharing your frugal ideas. One doesn’t need to spend a lot for a big change.
Outstanding as usual! The “brick” wall, the shelves, the painted vanity, the framed mirror, the shelves in the toilet room, the cute toilet paper holder- all executed so well.
Outstanding as usual! The “brick” wall, the shelves, the painted vanity, the framed mirror, the shelves in the toilet room, the cute toilet paper holder- all executed so well. I also like the towel hooks, the recycle of the white shower curtain, the window curtains.
Wow! This is a beautiful transformation! I love it all!
Wow, I can’t believe how much you did in here, and it all looks amazing! You rocked your budget – I’m so impressed. I love the new vanity and the frame around the mirror. And that faux brick adds so much texture. Love it all!
Wow, what a transformation! I can’t believe you were able to make so many great changes with this budget. I absolutely love all of the interesting elements that you added! The wood frame mirror plus the brick wall ?
Once again, your $100 created one of the most amazing spaces. I always love what you do with your rooms for this challenge. My jaw literally drops every time because it looks like it cost $1,000+, not $100! I am so glad you decided to join another round of the challenge. As always, amazing job!!!
Gorgeous!!, like all your decorating ideas, will share these with my friends…
Wow! This is a beautiful transformation! I can’t believe you were able to make so many great changes with this budget. I love the German Schmear brick wall behind the toilet! Thanks for sharing your frugal ideas.
Wow!
This is a beautiful transformation! I can’t believe you were able to make so many great changes with this budget. I love the German Schmear brick wall behind the toilet! Thanks for sharing your frugal ideas.
I am so impressed with your new bathroom. It is so beautiful and fresh. I really like the gray and white color combination with all of the wood and black accents. Nice Job
CHRISTINA,
Wow! what a transformation!
I can’t understand, how you manage such transformation within the budget? I would not like to explain separately, rather the total combination was great, especially, Wall paint, Mirror frame, Brick wall, and wood shelves. Finally, It’s an awesome bathroom makeover and looking so nice. Your presentation was amazing and hope inspired all readers.
Thanks for sharing.
Wow Christina,
What a transformation! Those are looking so beautiful. I love it!
Where is the shower curtain from? I love this and am ready to transform my bathroom as well:)
The biggest improvement was the clean grout!