
I am a little late to the “sunburst bandwagon” that seemed to run through blogland last summer, but I’ve never been one to be on the peak of fashion or décor so why start now? ![]() I actually did make this at the end of last summer before I was blogging here and just haven’t showed it to you yet. The other part of the story is as much as I LOVE it, I can’t find seem to find the perfect place in my house for it. I am thinking it will probably end up in my guest bedroom or master bedroom (maybe over the bed?), but since neither of those rooms are finished yet I haven’t put it in there. So for now it gets used over my mantel a few times a year and then sadly put back into storage the rest of the time.
I actually did make this at the end of last summer before I was blogging here and just haven’t showed it to you yet. The other part of the story is as much as I LOVE it, I can’t find seem to find the perfect place in my house for it. I am thinking it will probably end up in my guest bedroom or master bedroom (maybe over the bed?), but since neither of those rooms are finished yet I haven’t put it in there. So for now it gets used over my mantel a few times a year and then sadly put back into storage the rest of the time.
There are many different ways you can make these DIY sunburst mirrors and I will show you some different ones at the end.
But here is what you will need to make one that looks like mine:
- a mirror (I got mine at Hobby Lobby in the candle section for 50% off so $2.50)
- paint sticks (about 50) – beg, barter, steal (ok, don’t steal them, they are free) these from your closest home improvement store or even the paint section in Wal-mart. I found the quality of Home Depot paint sticks to be better than Lowe’s (Lowe’s sticks were thinner and had rounded edges) but that might vary in your area. Collect a few each time you go or if you can find a nice employee get up the nerve to ask if you can have 50 for a craft project. I collected about 10 each time I went until I finally had my stash built up. Did you guess from yesterday this was what it was made from?

- wood embroidery hoop (from Hobby Lobby – $1.50)

Start by taking the little foamy dots off the back of the mirror.

I originally started laying out and gluing my paint sticks directly onto the back of the mirror. But I realized that it was going to hard to get them to them all to fit evenly at an angle where the ends were butting up to each other.

So I went to plan #2. I found a scrap piece of wood in the garage that was perfect size. I glued the mirror onto the center of the square of wood. I then took the embroidery hoop apart and only used 1 of the wood circles and glued it on top of the mirror. This gave me a nice round edge and added some dimension.

Now I had to figure out how to have varying lengths in my sticks. I took half of them out to the garage and cut them off right above the notch with my saw.

I used the uncut sticks first (I know the picture shows the cut ones – ignore that – I had to redo it and didn’t take a picture the second time) and glued those down evenly spaced all around the embroidery hoop. Then I glued the cut ones/the shorter ones right on top of those in between each of the longer sticks evenly spacing them all the way around.

I attached a metal picture hangar on the back of the square of wood and it was ready to hang! Now if you wanted you could paint or stain yours and I might do that eventually to mine too. I just haven’t because I am not sure what the final resting place will be for it.

I love it over the mantel! You can get the details on my summer mantel here.

And it would look great stained a rich dark stain or painted white or even a fun bright color.

And for $4.00, this is a HUGE piece of art!

Now to give you some ideas of some different ways to do it, here are some from around blogland that jumped on the bandwagon a little sooner than me. ![]()
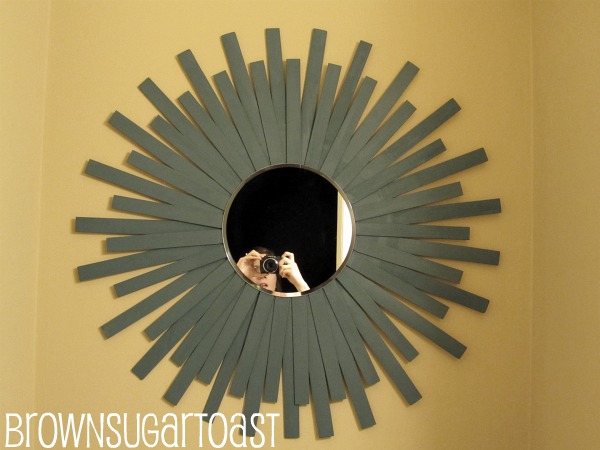
My friend Christa at Brown Sugar Toast did hers about the same as me but she figured out how to glue them right onto the back of the mirror. And painted hers a gorgeous shimmery gray!

Kate at Centsational Girl did hers the same way I did mine but she painted hers in two different colors.
Sarah at Thrifty Décor Chick just recently made two sunburst mirrors. She used packs of cedar shims that you can pick up at your local hardware store. If you don’t want to mess around with collecting 50 paint sticks these are just about the same thing and are less than $5 a pack.
So if you have a big wall to fill and need some cheap art with big impact, a DIY paint stick (or wood shim) sunburst mirror might be what you need! If you make one, I would love to see pictures of it!
{cj}
Sometimes I link up to these wonderful parties:
Sarahndipities, Skip to my Lou, Today’s Creative Blog, How to Nest for Less, Home Stories A to Z, Apron Thrift Girl, Tools are for women too, Not just a Housewife, A bowl full of lemons, Uncommon Designs Online, Someday Crafts, No Minimalist Here,Somewhat Simple, 36th Avenue, Sew Much Ado, The Style Sisters, The Thrifty Home, Domestically Speaking, House of Hepworths, The Shabby Creek Cottage, Weekend Blogging party at Serenity Now, Home Happy Home, Tatertots and Jello, Funky Junk Interiors, The Girl Creative, Miss Mustard Seed, Chic on a Shoestring Decorating, Remodelaholic, The Lettered Cottage, Before and after party at Thrifty Decor Chick, Pinterest Challenge at Young House Love
Me likey! Love your mantel too!!! great job!
I love it!!!! I so wanna try this!!!
I love the embroidery hoop around the mirror – it really seems to finish the look. I have a beautiful sunburst mirror that I got from my mother after she passed away – and I love it – but I think I’ll make one of these too. This is more my “look”, casual and more earthy. I think staining the wood would be a good look. Thanks for the great ideas!
Wow! I really like this and may have to give it a try!
how big is this mirror
Oh my word! That looks great. I wish I would have found this easier way before I did mine!
Thanks, Brianna! How did you do yours?
Here, you can take a look!
http://teawithbri.blogspot.ca/2012/11/diy-sunburst-mirror.html
What kinda glue did you use
I absolutely love this project! Can’t wait to try it out myself.
Sorry I’m English, what is a wood shim ? Great idea.
Great, I love sunburst mirrors, they are amazing!
This looks great! How did you attach the picture hanger to the back?
I LIKE YOURS BETTER WITH THE EMBROIDERY HOOP ATTACHED…GIVES IT MORE DIMENSION AND MAKES IT LOOK MORE FINISHED! GOOD JOB!!! I’M GOING TO DO IT! BUT, LIKE YOU, I’M NOT QUITE SURE WHERE IT WILL HAVE ROOM TO HANG IT
What kind of glue did you use to attach the sticks and wood? Hot glue gun or wood glue