This post is part of a series entitled “12 DIYs of Christmas”. You can see all the projects and post in this series here.
For the 5th DIY of Christmas, I created a DIY Wood Christmas Sign!

You can follow this same basic tutorial to create any color, design, or size sign that you wish! The large sign over my Christmas mantel was made this same way.

And this sign I used on my fall front porch was also done the same way.

So once you have your supplies and this tutorial, you can create basically any saying, in any color, in any size on a wood sign!
Here’s the supplies you will need (affiliate links included for your convenience):
- wood for sign – I prefer using 1/2 inch sanded plywood. Home Depot sells this in a 4 foot by 8 foot sheet but they also sell it in smaller project pieces like this 2 foot by 4 foot piece as well. So depending on how many wood signs you think you will determine which size you would buy. You will also need to either ask them to cut it down for you, or have a way to cut it down yourself.
- 1×2 pine board for the frame. These are super cheap – only $1 each – just make sure you get a straight piece.
- stain – I used Varathane Dark Walnut on all of these signs
- paint – I used Rustoleum Chalked paint in Linen White and Charcoal
- carbon paper
- printed design of your choice
- paint markers- my preferred brand is Elmer’s Painters Paint Markers. You can find these in store at Walmart in the craft section for less than $2 each. They come in different tip sizes from fine, medium, chisel, and more. Or here is a set of 5 medium point markers including black and white you could order online from Amazon.
- wood glue or nail gun to secure frame to board
I know that list of supplies may seem daunting, but once you have carbon paper, paint markers, have some black or white paint on hand, and have a larger board that could be cut into smaller sizes these signs are easy to make and the smaller ones I made cost less than $5. The Home for the Holidays sign and Home Sweet Farmhouse sign are both the same size – the plywood is 11×14 inches which works well for a design you print out on standard size 8.5×11 inche paper. Cut your wood to size and then sand the front/back and sides if needed. Paint board in color of your choice. I am loving adding black to my home right now which is why I did the last 2 signs I did in black with white wording. But white background and black wording is a classic design.
Now to print out your design. If I am doing a smaller sign 11×14 inches or less I will just design the wording I want using Picmonkey.com or another online photo editing software. You could also use Microsoft Word or Google Docs. Just vary your text size/design until you get it the way you like it. You can also find countless free printable designs online and could print one of those and use it to transfer the design to a wood sign.

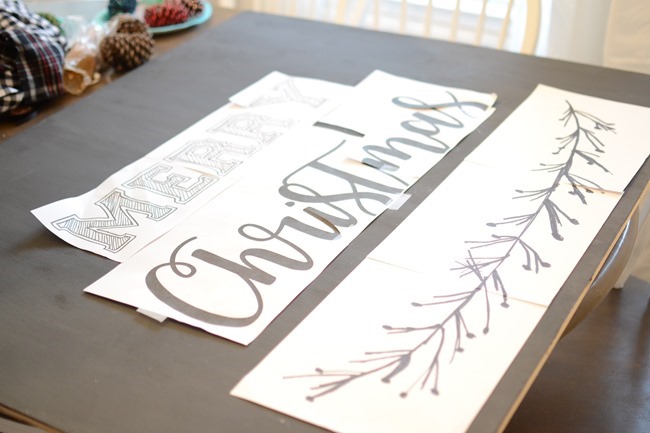
If I am doing a larger sign I use Microsoft Word or Wordpad. You will still design your text how you want and then make it super large like size 200 or 300 so it will stretch to multiple pieces of paper. As you can see for the Merry Christmas sign I had multiple pieces of paper I taped together to form the words. I just freehanded the vine and berry design on paper so I could transfer the same design on top and bottom of my sign.

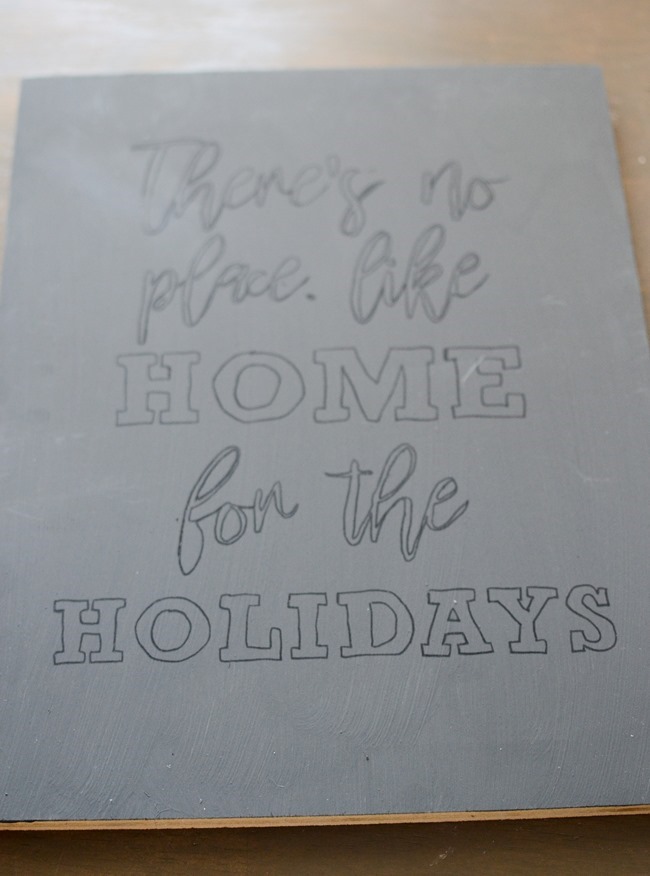
Put a piece of carbon paper behind the paper and then just trace your design! You will want to trace the outline of the letters only and you will fill them in when you use the paint marker.

Here’s how it looks – your design is now transferred to your wood board!

Then you will use the paint marker to trace again and fill in your wording. Here’s a picture of the markers I used. I used a fine and medium point for this – the medium for the scrolly text and the fine for the block text that I did the lines inside.

I find it helpful to trace the outline first and then fill in the middle. You may have to go over it twice (letting the first coat dry) to get the desired look you want.

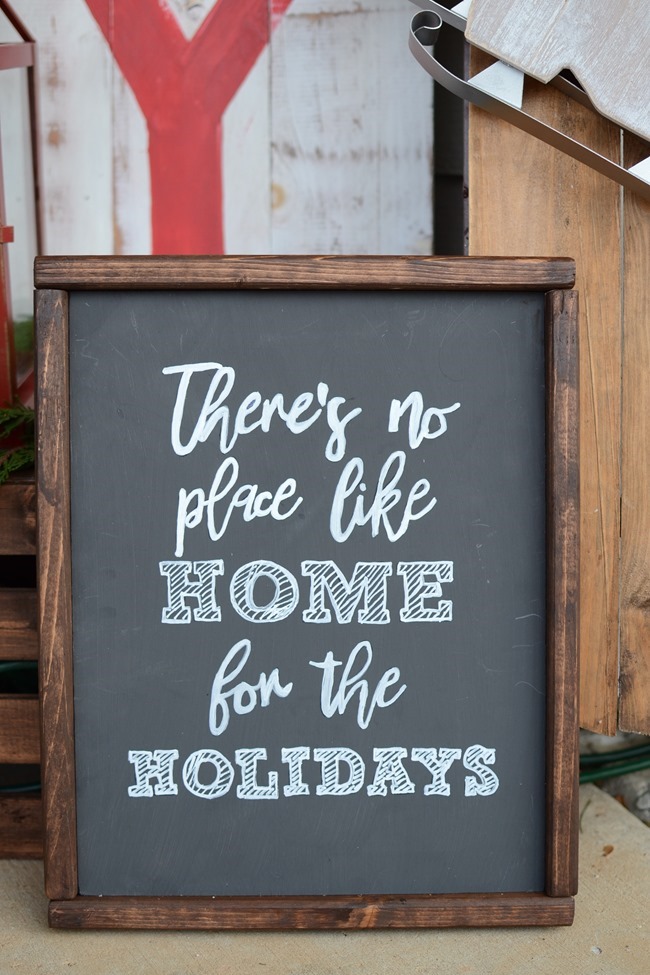
Here it is all done! I had tried making signs like this before and painting with a small brush and paint and just never could get my wording to be crisp and clear like this. Using carbon paper and a paint marker allows you get an almost printed on design – just like you bought it a store! ![]()

Cut your 1 x2 boards to size either mitering the corners or just doing a more rustic frame with straight cuts seen below. Stain and let dry while painting and lettering your board. I use a nail gun to secure but if you don’t have access to a nail gun you could use wood glue and just prop it up gluing 2 sides at a time until they were dry. You can make your 1×2 boards be in the middle of the edge like I did below, flush with the front, or flush with the back making more of shadowbox effect. Either way you do it you could also use the back of your sign to paint a different design making every sign you make 2 sided and serve double purpose! So think maybe a fall design on the back and a Christmas design on the front. Less to store and more to enjoy! ![]()

I’m using this sign as part of my front porch decor right now.

I’ll share my whole front porch decked for Christmas next week but here’s a sneak peek! ![]()

And just for fun here’s the design I used for the Home for the Holidays sign. Just right click on this image, save to your computer, and then you can print out and use to make your own sign!

What kind of sign would you make? Have you ever tried this method for making wood signs?
I am sharing 12 easy and inexpensive Christmas projects just like this during 12 DIYs of Christmas series. You can see all the projects in this series here. And check out all my past Christmas DIY projects and decor here.
I have two questions, and the answers are probably obvious, but give a girl a hand, will you? What font did you use for “there’s no place like”. Did you put your frame on the edge of your board? I have read your description a couple times and still don’t get it. Bear with me…I’m old 😉
Love these signs!!! Can you please share a picture of the back? I’m not understanding what you mean by flush with the front or flush with the back, and how it can be reversible and the frame look the same on both sides. Also, where did you nail the frame to the plywood? Thanks!
Lovely signs!
I love your sign making project and just want to ask you which of the three levels of Picmonkey do you recommend?
Thanks so much, Christina for sharing this. I love the way the sign is big enough for any incoming visitor to see it. I love to have signs like this especially for motivational quotes or something to use as direction just outside the home. I like it even better that I’m not paying anyone to help me do this.