This post is part of a series – “31 days of Pinterest: Pinned to Done” You can read all the posts in this series here. And to make sure you don’t miss anything you can sign up to have every post sent to your email, follow me on facebook, or subscribe in your reader.

")
I hosted a party last week and I wanted to serve a menu full of “fall-themed food.” We had apples and caramel dip, s’mores bars, bacon wrapped hot dogs, pumpkin cream cheese muffins, and pumpkin cream pie in individual servings in mason jars. Oh, how fun those desserts were and delicious too! And honestly I think it only takes just a few minutes longer to make them in individual jars instead of one pan.
This was the original pin that inspired it. Pumpkin Cream Pie from The Crafting Chicks.
I started by buying a dozen half-pint sized mason jars. They run less than $10 at Wal-mart. I plan on canning apple butter again in a few weeks, so I will be needing those jars for that anyways. (I will just wash and reuse them.)
")
Prepare your crust. (Full printable recipe below.) I spooned some of the crust in each of the jars and pressed it down.
")
Then I mixed up the pumpkin filling. Because I decorate cakes I had pastry bags on hand. If you don’t, you can easily use a large ziploc bag. Spoon the filling into the bag and cut off the corner of the ziploc bag. Then pipe the filling into each jar. This makes this part super easy!
")
Then top with a spoon full of cool whip or reddi whip.
")
Love the pretty layers!
")
If you wish you can sprinkle on a bit of pumpkin pie spice or cinnamon on the top.
")
Everyone loved these at the party. I didn’t even get to eat one that day so when I finally pulled mine out of the fridge to photograph and then eat, I found out why! They were super yummy!
")
Now, for the free printable part of it.
")
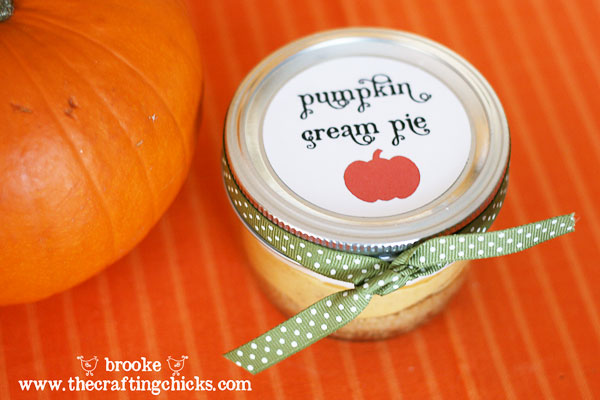
This is how I presented them at the party. I created a printable with 12 jar toppers on it. Printed it out, cut out the circles, topped the jars and then screwed back on the lid. Then served a tray full of ball jars topped with these cute jar labels.
So cute!
")
And just in case you decide to make these, I will include the Ball jar topper label so you can print it too. Just click on the image, then right click and select “save image as”. Then you can open it and print it (select 8 x 10 for the size and print it on a regular 8 1/2 x 11 sheet of paper). I printed it on a sheet of cream card stock.

And here’s the recipe in printable format.
- Graham Cracker Crust:
- 1½ cups finely crushed graham crackers (about 1½ packages of graham crackers)
- ⅓ cup sugar
- 6 Tablespoons melted butter
- Pumpkin Cream Pie:
- 1 cup pumpkin (pureed)
- 2 cups cold milk
- 2 boxes of instant vanilla pudding (3.5 oz. size)
- 1 tsp. Pumpkin Pie Spice
- 1 cup frozen whipped topping, thawed (such as Cool Whip–or make your own whipping cream)
- Extra whipped topping for the top of the pies
- Mix graham cracker crust ingredients together. Press into the mason jars with your fingers, and chill.
- Mix together all filling ingredients in a bowl by hand or on low speed with a blender for 1 minute. Spoon filling into mason jars on top of the graham cracker crust. Top with a layer of whipped topping and chill in the fridge for about 3 hours.
I hope you enjoy these as much as we did! I definitely plan on making these again this fall. They were delicious and the presentation in the ball jars make them as look as good as they taste!
")
I am joining Nester from Nesting Place in writing a 31 days series in October. You can see all the other hundreds of people writing a 31 days series here.
And I am excited to have 3 blogging friends join me in the insanity! Check out their series by clicking on the buttons below.


And my sister-in-law is joining along too! Writing about their transition as they move across the country with four children.


Christina
What a cute idea! I’ve recently gotten into gifts in jars and will have to try this! Thanks for your kind words on my blog at Serenity Now.
Heavenly sounding!! Will try for sure!
I want to try these! They look so cute and yummy!!!
So cute! I printed the recipe. I hope to try it. Thanks for sharing. laurie
These look darling & delish!
Enjoyed looking at your October projects and especially love your “barn wood” from the pallet.
Hello, I love love love this idea! my question is if I want to give these out to teachers for gifts what would you use for the whip cream topping instead? I think it would melt by the time they made it to school with my daughter. Any tips or suggestions? thanks so much. Marcie
Thanks- this looks delicious!